12. Virtual Environments and Packaging
View code on GitHub Download slides (PDF) Get the Video Course
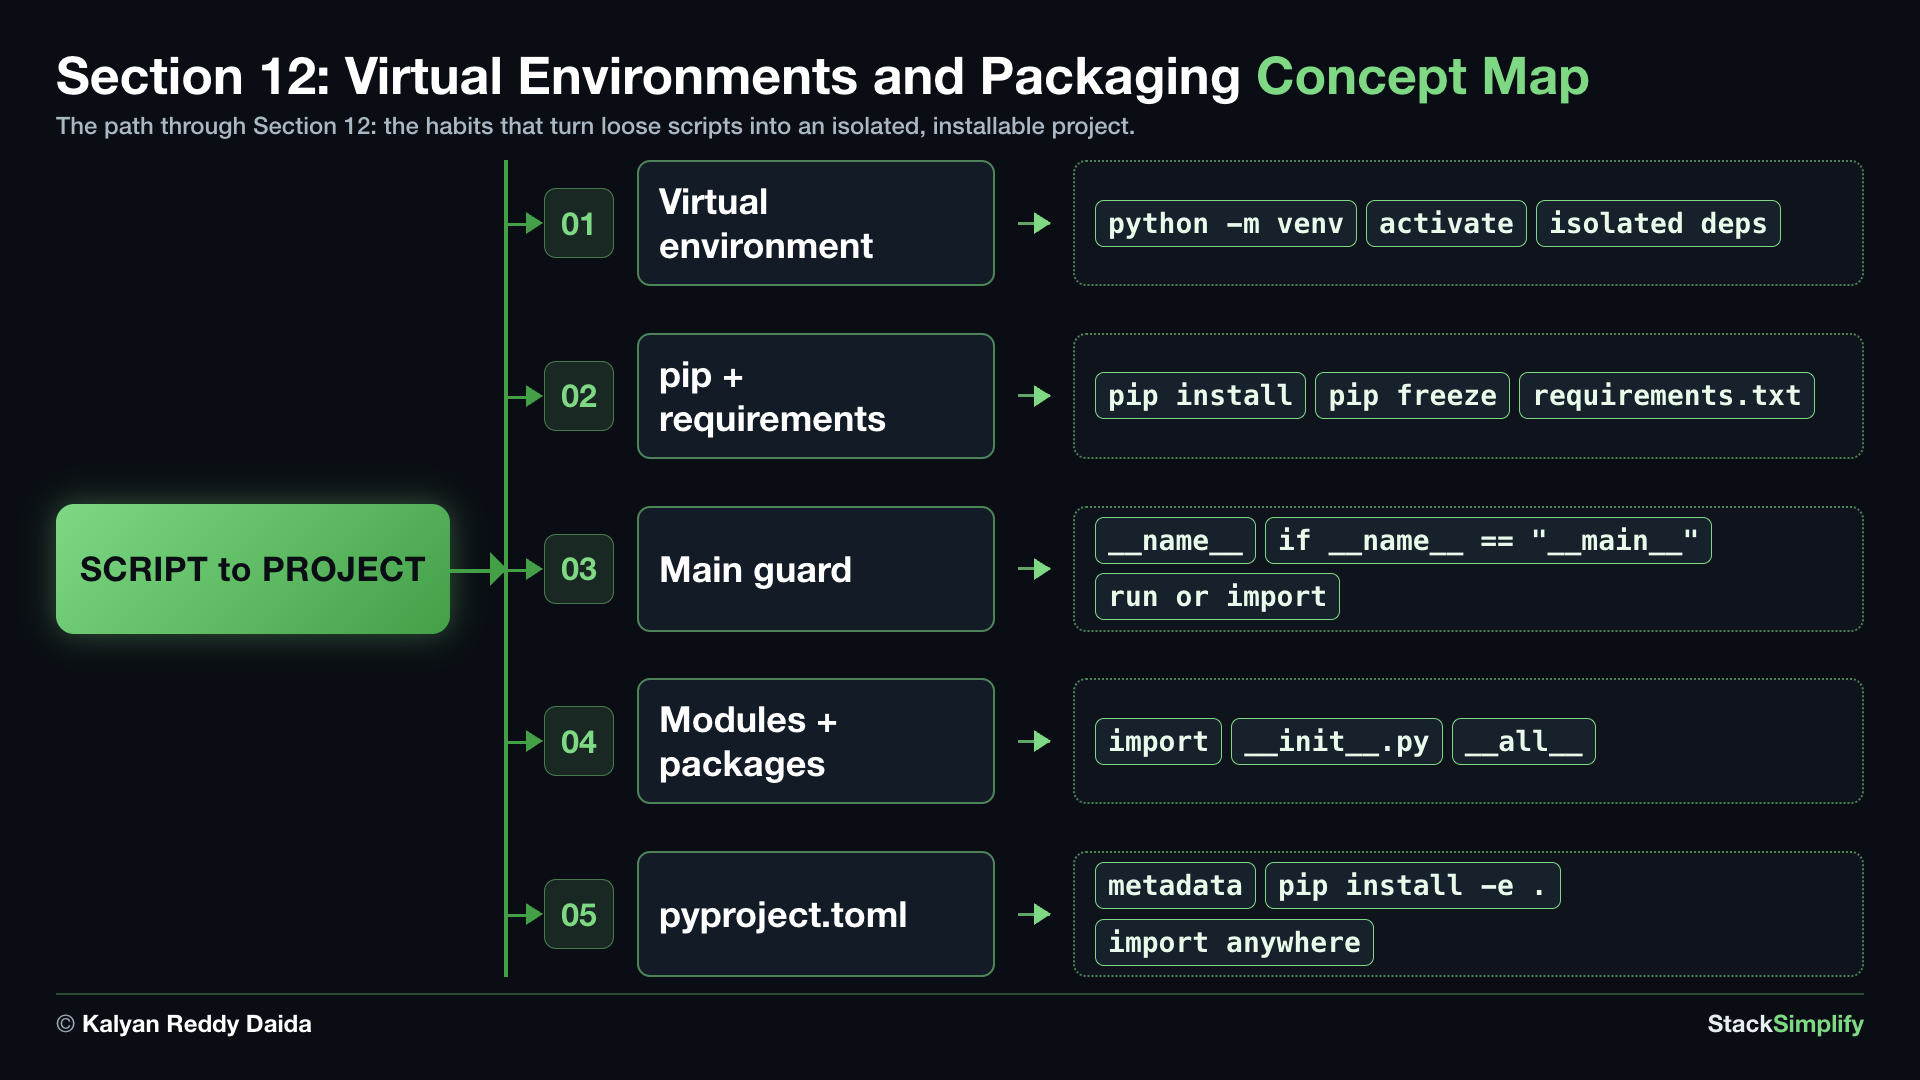
So far you have written single .py files. Real projects need two more habits: a virtual environment so each project keeps its own clean set of installed packages, and a way to organize your code into modules and packages you can import, reuse, and even install. This section teaches both: the bridge from "a script" to "a project you can install".
Check your work as you go
Every step has you build its own project in a fresh folder named after the step. If yours stops matching the lesson, compare it against the finished folder for that step: step01_my_project/, step02_my_project/, step03_main_guard_demo/, step04_my_project/, step05_my_project/, and step05_my_project2/, the second project Step-05 builds. None of them contain a .venv/, because you never share one. Each README says how to make it.
Practice as you go
Each concept below has matching exercises. When you finish a step, head to the Practice problems for this section. Every problem includes a solution you can expand.
Step-00: What You Will Learn
- Why a virtual environment, and how to create + activate one (
python3 -m venv .venvon macOS and Linux,python -m venv .venvon Windows), and how to SEE you are inside it. - Install third-party packages with
pip, record them withpip freeze > requirements.txt, then rebuild a fresh environment from that file and watch the packages come back. - Meet the special names Python gives every file (
__name__,__file__,__doc__), then guard "run-it-directly" code withif __name__ == "__main__"and see the bug it fixes. - Split code into your own module and a package (a folder whose
__init__.pyis its front door, with__all__forimport *), and import it. - Turn your package into an installable project with
pyproject.toml+pip install -e ., so it imports from anywhere. - Prove the whole workflow end to end in a Run It Checkpoint.
Step-01: Virtual Environments: one clean toolbox per project
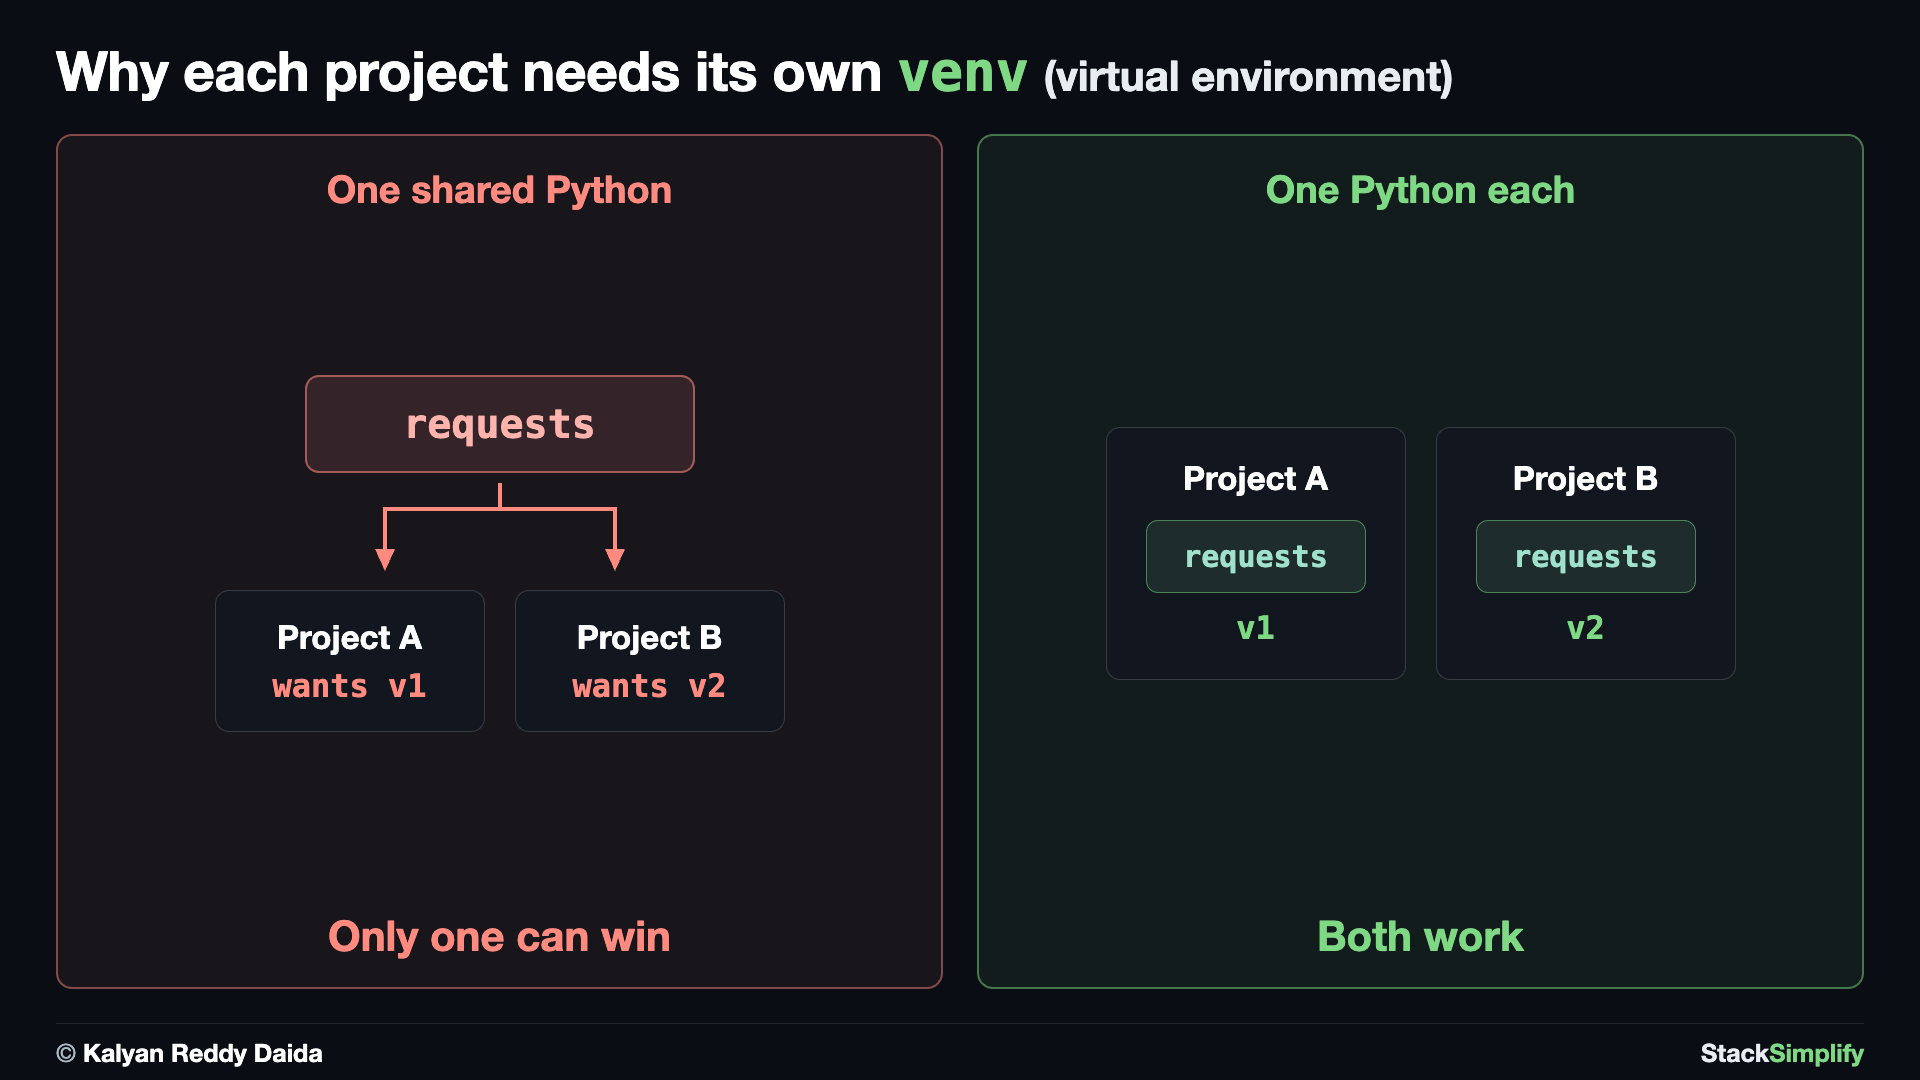
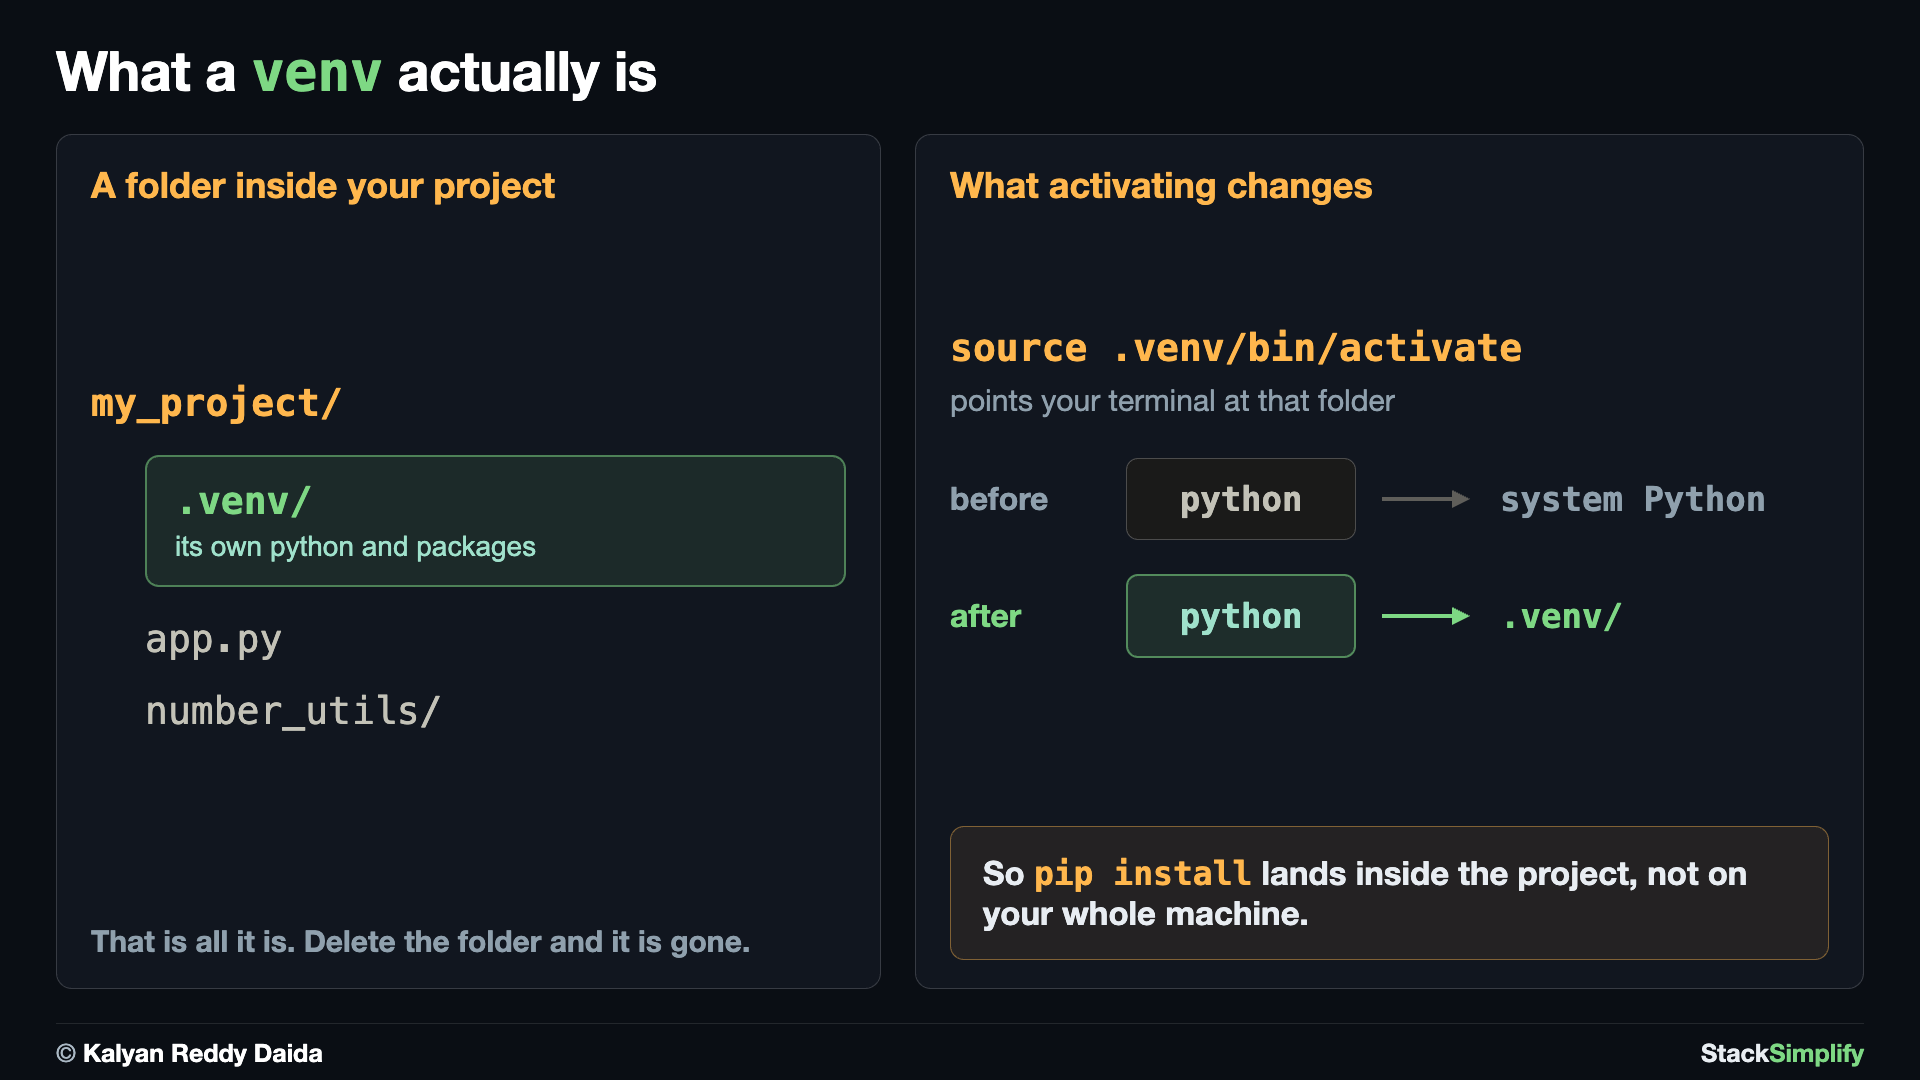
Question: project A needs version 1 of a library and project B needs version 2: how do you stop them clashing? A virtual environment (venv) is a private Python for one project. Install what you like inside it and nothing leaks out to the rest of your machine.
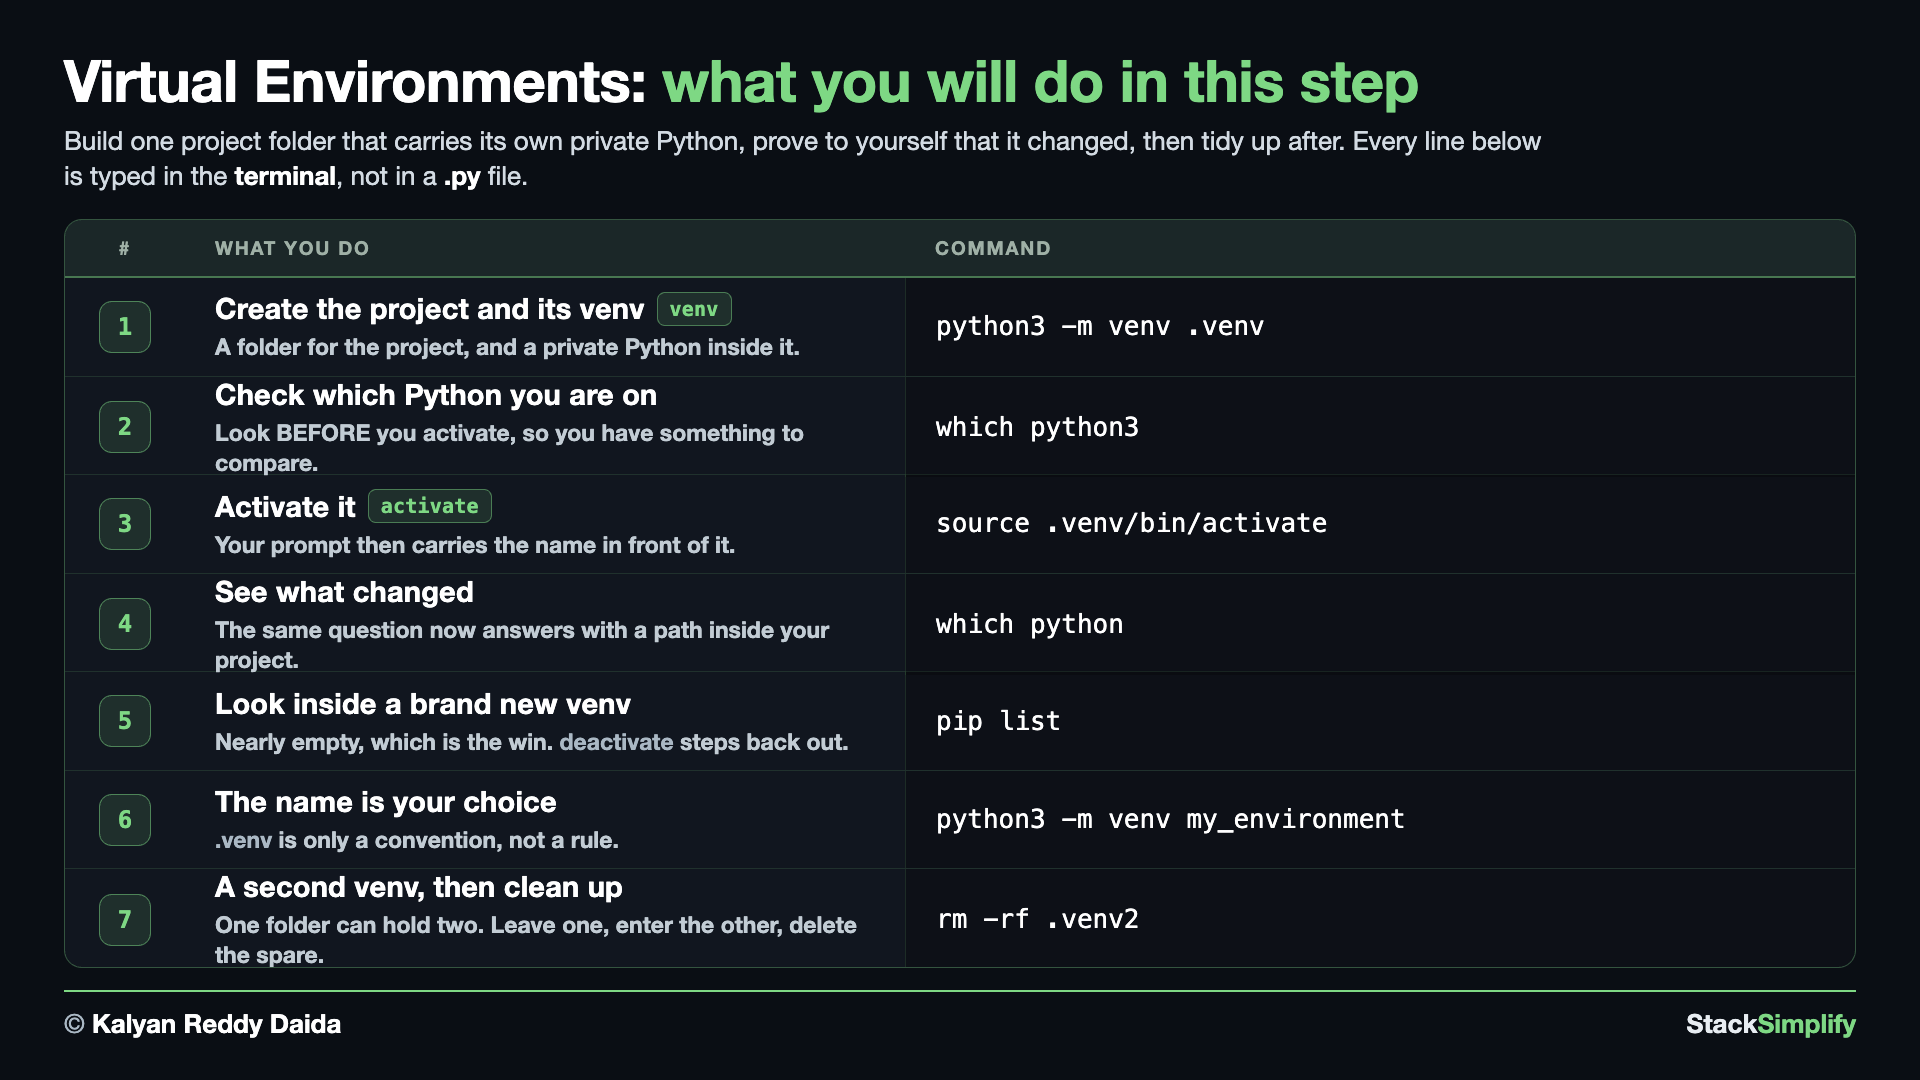
You build a small project folder here and look at what a venv actually changes. Every step in this section starts a fresh folder of its own, named after the step, so each one begins clean. This one is step01_my_project.
1. Create a project folder and a virtual environment
The pattern is python3 -m venv <folder-name>, and you choose the folder name. .venv is only a convention: the leading dot hides it on macOS and Linux, and most tools look for that name. Python does not require it. You come back to this in 6. The name is your choice below.
2. Check which Python you are using now
Before you activate anything, look at what your terminal reaches for. This is the BEFORE half of the comparison, and it is the whole point of the step.
That is your system Python, shared by everything on the machine.
3. Activate the virtual environment
If PowerShell answers "running scripts is disabled on this system", Windows is blocking the activate script. Allow it once for your own account, then run the activate line again:
Using Command Prompt instead of PowerShell? Activate with .venv\Scripts\activate.bat.
Your prompt now carries the environment name in front of it:
4. See what changed
Same two questions as 2. Check which Python you are using now. Different answers.
Notice something on macOS and Linux: before you activated, you had to type python3, because a bare python does not exist there at all. Now that the venv is active, python works. Activating put the environment's own python at the front of your PATH, which is the entire trick.
5. Look inside, then step back out
These are the same on every system.
pip list
# Package Version
# ------- -------
# pip     26.1.2

python --version
# Python 3.14.6

deactivate
A near-empty pip list is the win: this project starts from a clean, isolated toolbox. Watch a venv grow in Step-02. After deactivate the (.venv) disappears from your prompt and python goes back to meaning what it meant before you activated.
6. The name is your choice
.venv is a convention, not a rule. All of these are valid:
We use .venv throughout the course because tools and editors look for it by default.
7. A second environment, side by side
Nothing stops one folder holding two environments. Make another with a different name:
The folder now holds both:
8. Switch between them, then clean up
There is no "switch" command. You leave one and enter the other.
.venv2 was only there to show that the name is yours to choose, so delete the spare and keep .venv. A real project keeps exactly one.
You are left with one activated .venv inside step01_my_project.
Why python3 on macOS and Linux, but python on Windows
macOS ships no python command at all, and the python.org installer you used in Section 01 creates only python3. On Windows it is the other way round: the command is python, and python3 usually does not exist. That is why the tabs above differ. The -m venv part means "run Python's built-in venv tool", and you only create the environment once per project. Once the venv is ACTIVE, python works everywhere, because the venv puts its own python on your PATH.
VS Code picks the venv up for you
When VS Code sees a .venv, it offers to use it. Say yes, or choose it yourself from the Command Palette (Cmd + Shift + P on macOS, Ctrl + Shift + P on Windows and Linux), then Python: Select Interpreter. New terminals then activate it for you.
Never commit the venv: you share the LIST of packages (Step-02), not the installed files:
Steps 04 and 05 create the last two for you: __pycache__/ holds compiled bytecode, and *.egg-info/ is bookkeeping from the editable install. Neither belongs in Git.
One .venv per project
Daily rhythm: cd into the project, activate, work, deactivate when done. Create a fresh .venv inside each project folder and add .venv/ to .gitignore.
Step-02: Installing Packages with pip
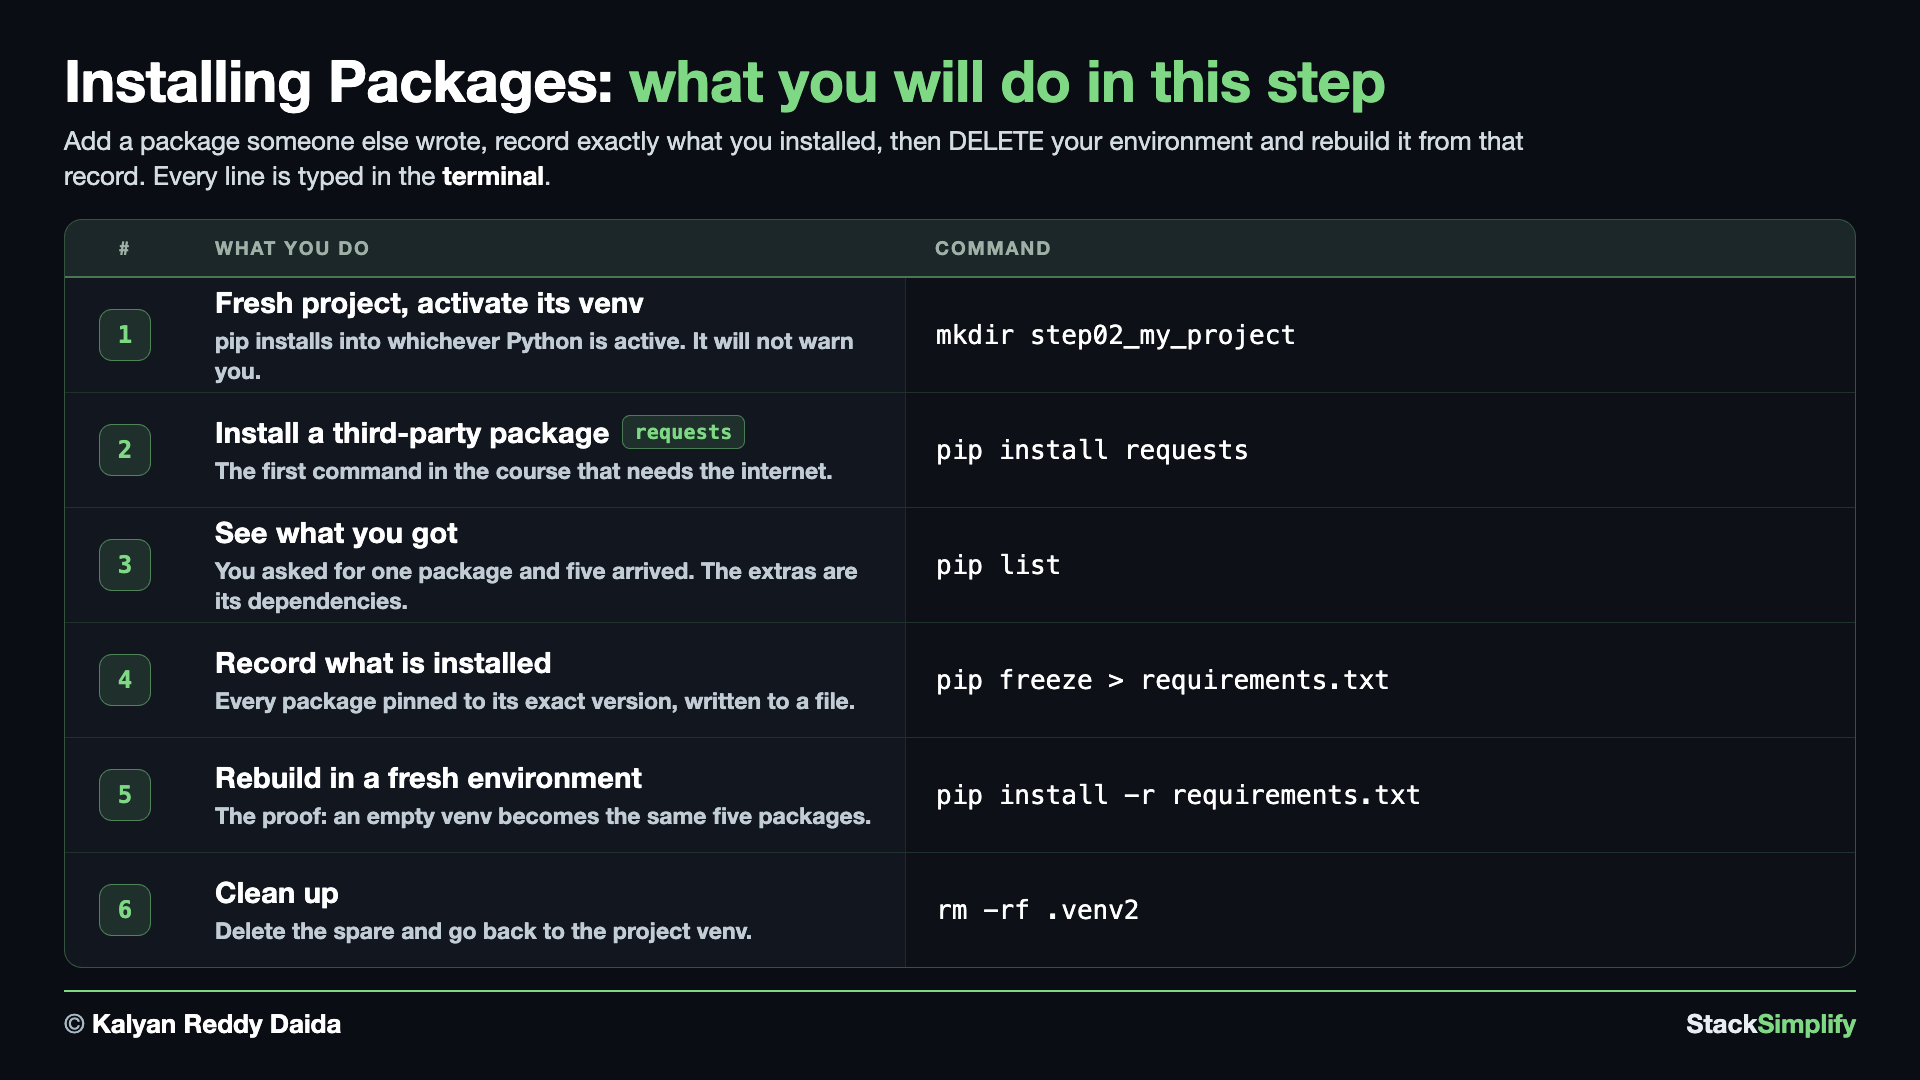
Question: how do you add a third-party package to THIS project, and record exactly what you installed so that anyone can rebuild the same environment? pip installs INTO the active venv, pip freeze writes the exact versions to a requirements.txt, and pip install -r rebuilds from that file. This step does not just describe that round trip. You run it.
1. Make a fresh project folder and activate its venv
pip installs into whichever Python is active right now, so activating first is not a tip, it is the whole job. Activate, then install: the packages land in the project. Install without activating and they land in your system Python, which is the mess Step-01 exists to prevent.
This step gets its own folder, step02_my_project, next to step01_my_project. Leave Step-01's venv, step out, and start the new project with a venv of its own:
Opened a new terminal since Step-01? Then no venv is active: skip deactivate, and instead of cd .., cd to the folder that holds step01_my_project.
Your prompt now shows the new project's venv:
Every step from here on starts exactly this way: a fresh folder named after the step, and a venv of its own inside it.
2. Install a third-party package
requests is the package most Python code uses to fetch things over the web, and it is one of the most downloaded packages on PyPI.
Collecting requests
  Using cached requests-2.34.2-py3-none-any.whl.metadata (4.8 kB)
Collecting charset_normalizer<4,>=2 (from requests)
Collecting idna<4,>=2.5 (from requests)
Collecting urllib3<3,>=1.26 (from requests)
Collecting certifi>=2023.5.7 (from requests)
Installing collected packages: urllib3, idna, charset_normalizer, certifi, requests

Successfully installed certifi-2026.7.22 charset_normalizer-3.5.1 idna-3.19 requests-2.34.2 urllib3-2.7.0
pip prints a line per package as it collects them, then installs the lot. The line that matters is the last one. Successfully installed is how you know it worked, and it is the first thing to look for whenever an install does not go your way.
This one needs the internet
pip downloads packages from PyPI, so this is the first command in the course that needs a working internet connection. If it fails with a connection or timeout error, check the network and run it again.
3. See what you got, and why it is more than you asked for
Package            Version
------------------ ---------
certifi            2026.7.22
charset-normalizer 3.5.1
idna               3.19
pip                26.1.2
requests           2.34.2
urllib3            2.7.0
You asked for ONE package and five arrived. requests cannot do its job alone: urllib3 makes the connection, certifi carries the list of trusted certificates, and idna and charset-normalizer handle text and addresses. Those are its dependencies, packages that another package needs in order to work, and pip installs them for you without being asked.
That is also the venv earning its keep. Five packages just landed somewhere, and because you activated first, that somewhere is step02_my_project/.venv and nowhere else on your machine.
4. Record what is installed
pip freeze prints every installed package pinned to its exact version. Send that output into a file instead of the screen:
The > takes what the command would have printed and writes it to the file, creating it if needed. requirements.txt is the conventional name, and tools everywhere look for it.
certifi==2026.7.22
charset-normalizer==3.5.1
idna==3.19
requests==2.34.2
urllib3==2.7.0
Notice what is NOT in there: pip itself. pip list showed it because it is installed, but pip freeze deliberately leaves out the tooling that every venv already comes with. The file lists what YOU added.
This file is the thing you commit to Git. The .venv/ folder is not, which is why Step-01 put it in .gitignore. You share the LIST, and everyone rebuilds their own copy of the folder from it.
5. Prove it: rebuild in a fresh environment
A file full of version numbers is only worth something if it can genuinely rebuild an environment, so do not take that on trust. Leave .venv, build a brand new empty environment, and restore into it.
Look inside BEFORE restoring anything:
Just pip, exactly like .venv was at the start of Step-01. Now restore from the file:
-r means "read the requirements from this file". Ask the same question again:
Package            Version
------------------ ---------
certifi            2026.7.22
charset-normalizer 3.5.1
idna               3.19
pip                26.1.2
requests           2.34.2
urllib3            2.7.0
The same five packages at the same five versions, in an environment that held nothing a moment ago. THAT is what requirements.txt buys you. A teammate clones your project, creates their own venv, runs one command, and is working in your exact environment. So is future-you on a new laptop.
6. Clean up, and the whole flow at a glance
.venv2 has done its job, so delete it and return to the project's real environment.
RECORD  (in .venv)                    RESTORE  (in .venv2)
    pip install requests                  pip install -r requirements.txt
    pip freeze > requirements.txt         the same packages, same versions
              |                                        ^
              +-------->  requirements.txt  -----------+
                          (commit this file, never .venv/)
You are back in step02_my_project with .venv active and a requirements.txt sitting beside it. Step-03 starts a fresh folder next to this one, the same way this step did.
Step-03: The __main__ Guard: Run It or Import It
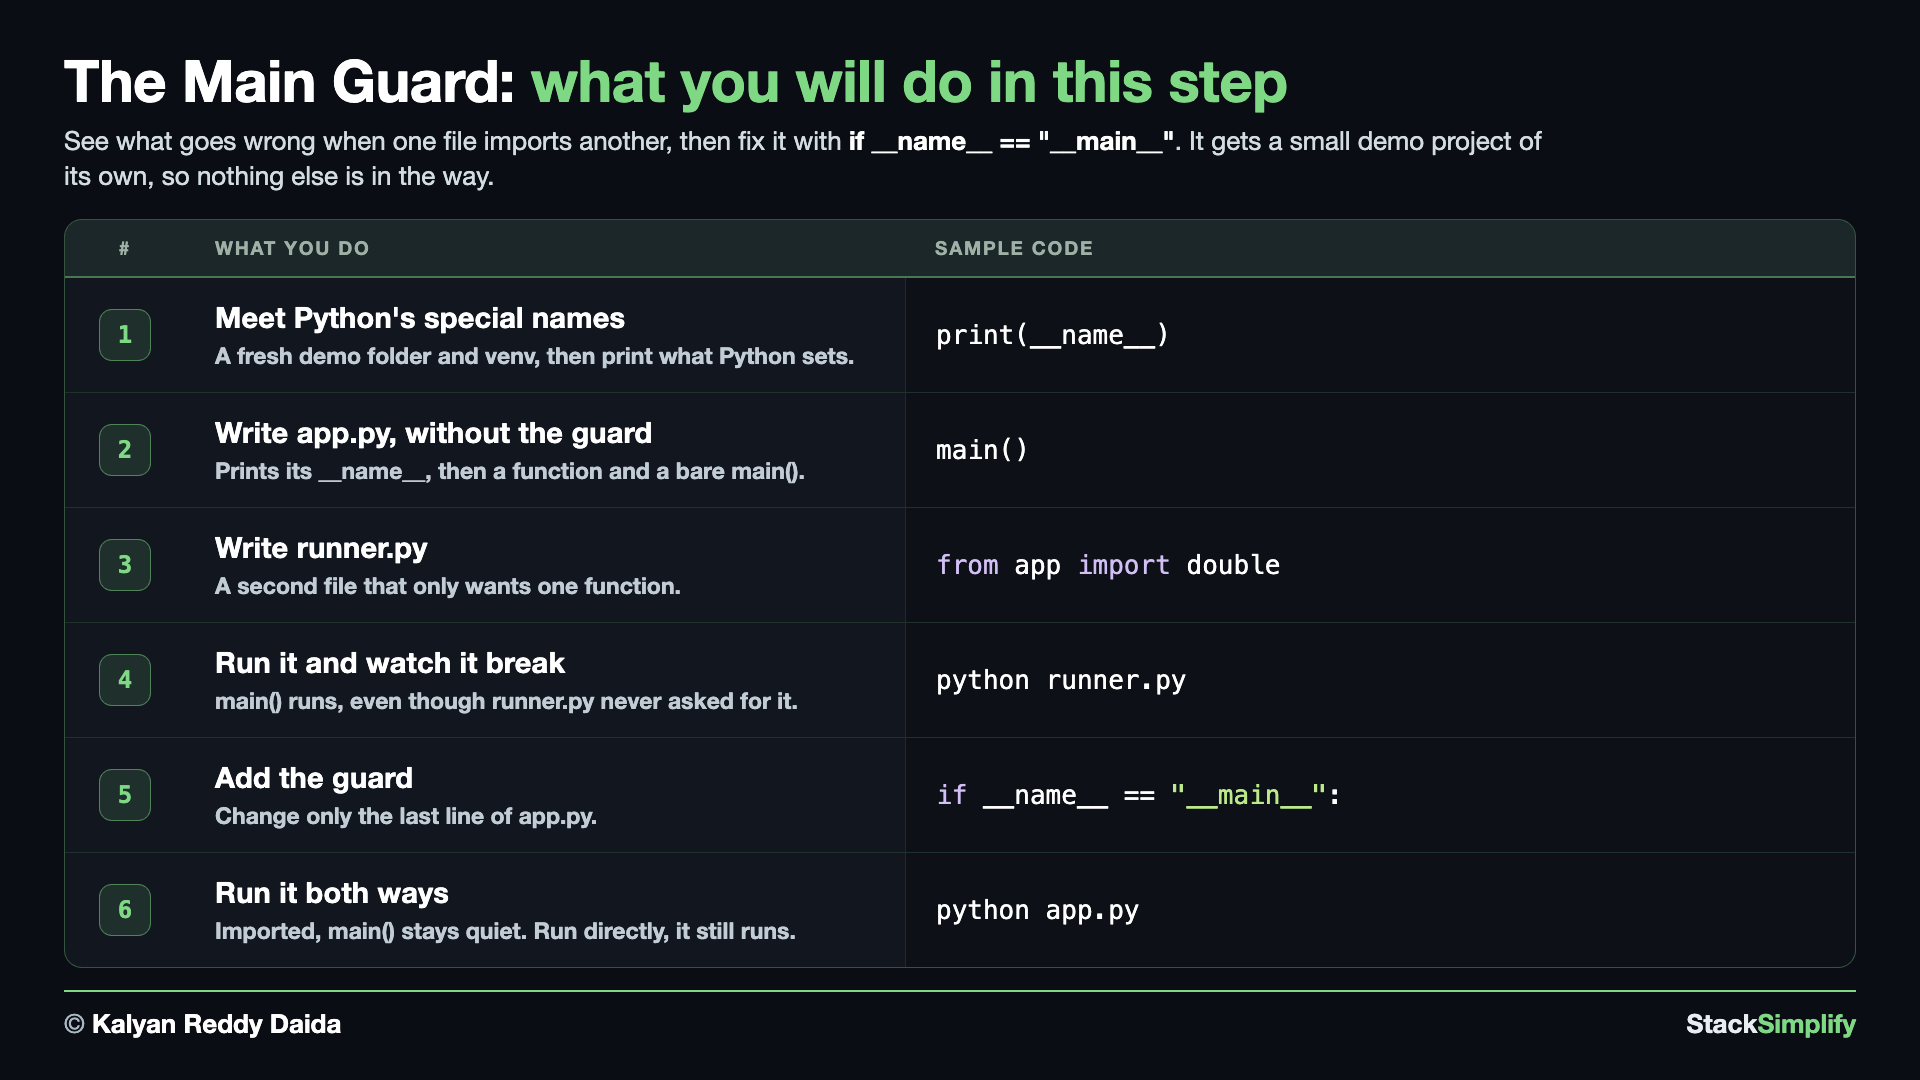
Question: when another file imports yours just to borrow one function, how do you stop your file's own "run me" code from firing as well? Put that code under if __name__ == "__main__":. It runs when you run the file, and stays quiet when the file is imported.
This gets a small project of its own, so the idea is not tangled up with anything else: first a quick look at the special names Python gives every file, then two files, one bug, one fix.
1. Meet Python's special names
Start with a fresh folder next to step02_my_project, not inside it, and give it a venv of its own the way Step-02 did. The python commands below need an active venv on macOS and Linux.
New terminal? Skip deactivate, and cd to the folder that holds your step folders instead of cd ...
Python quietly creates a few names in every file you run. They are the ones wrapped in double underscores on both sides, like __name__, and you never have to define them yourself. Open step03_main_guard_demo in VS Code, create special_names_demo.py, and print three of them:
"""Explore a few special names Python gives to every file."""

print("__name__:", __name__)
print("__file__:", __file__)
print("__doc__:", __doc__)
The first line is a docstring: a plain string at the very top of a file that says what the file is for. Python keeps it for you.
__name__: __main__
__file__: /Users/you/step03_main_guard_demo/special_names_demo.py
__doc__: Explore a few special names Python gives to every file.
You created none of those three names, yet all three have values:
| Name | What Python put in it |
|---|---|
__file__ | the full path of this file |
__doc__ | the docstring at the top of this file |
__name__ | "__main__", because you ran this file directly |
__name__ is the one this whole step is about. Right now it says __main__. In beat 4 you will see it say something else.
2. Write app.py, without the guard
In the same folder, create app.py. Its first line is the same kind of __name__ print, so you can see the value every time app.py loads. Then a useful function, and a main() called at the very bottom, which is how you have written every program so far:
print("In app.py, __name__ is:", __name__)


def double(n):
    return n * 2


def main():
    print("Starting the application...")


main()
3. Write runner.py, which only wants double()
A second file that borrows one function from app.py, and nothing else:
4. Run runner.py and watch it break
runner.py never asked for those first two lines. It only wanted double(), so why did app.py print anything, and why did main() run?
Because importing a file runs it, top to bottom. from app import double makes Python execute the whole of app.py: the print on its first line and the bare main() on its last line are both part of what gets executed.
Now look at that first line again. __name__ says app, not __main__. Same kind of print as beat 1, different value, because this time the file was imported instead of run. That difference is exactly what the fix uses.
5. Add the guard
Change only the last line of app.py:
print("In app.py, __name__ is:", __name__)


def double(n):
    return n * 2


def main():
    print("Starting the application...")


if __name__ == "__main__":
    main()
6. Run runner.py again
runner.py still gets its double(), and main() stays quiet. The print at the top still runs, because it is not inside the guard: the guard only protects the code indented under it.
7. Run app.py directly
The guard did not switch main() off. Run the file itself:
It still runs when you run it, and the first line shows why: __name__ is __main__ again. One file, both jobs.
The key idea. Python sets a variable called __name__ in every file it loads, and you have now seen both of its values printed. Which one you get depends on HOW that file was loaded:
How app.py was loaded | __name__ is | if __name__ == "__main__": | main() |
|---|---|---|---|
python app.py | "__main__" | True | runs |
from app import double | "app" | False | does not run |
That table is the whole trick, and it is why you will find if __name__ == "__main__": at the bottom of almost every Python file you ever read.
From now on, it is the default
Any file with a main() gets the guard, out of habit. You will find it already in place in Step-04's app.py, where it is not the lesson any more, just how the file is written.
Compare your work: step03_main_guard_demo/ holds this demo project in its finished state.
Step-04: Your Own Module and a Package
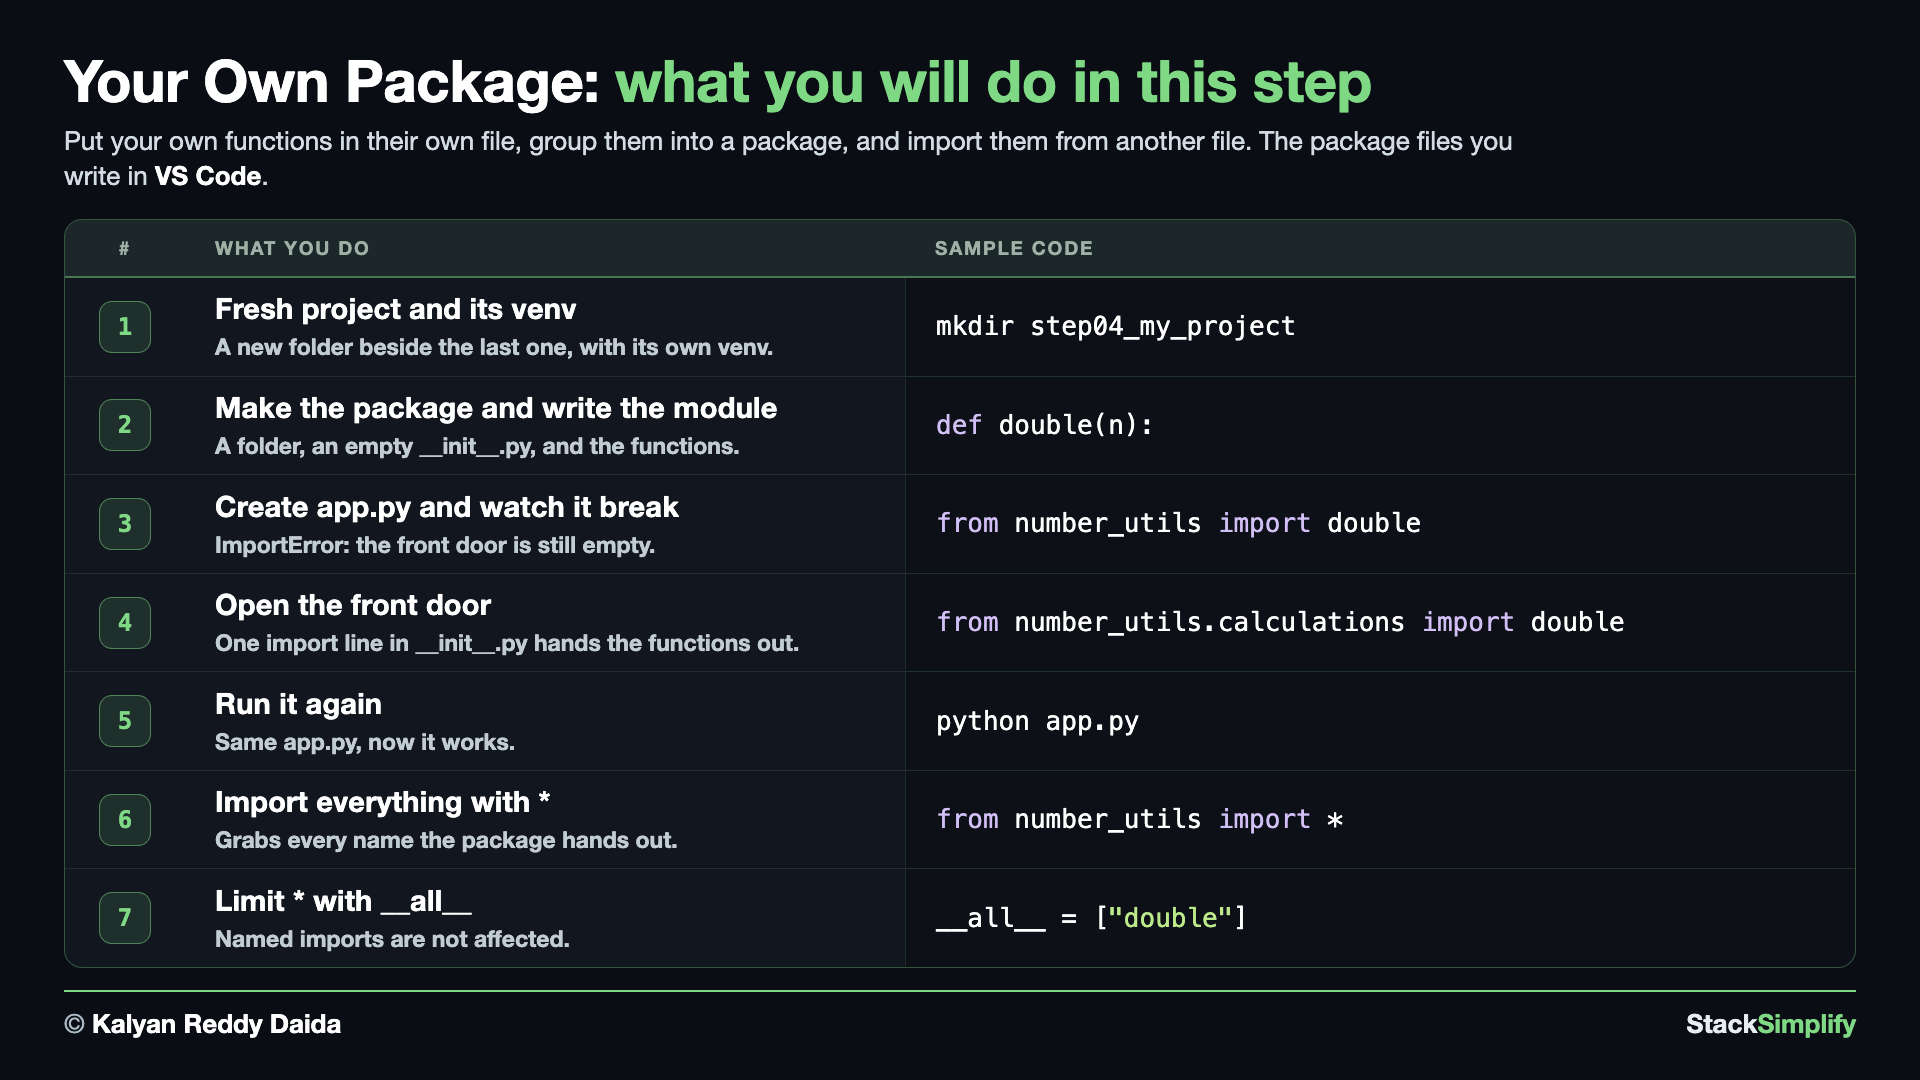
Question: how do you put your own reusable functions into their own file, and use them from another file? A module is any .py file you can import. A package is a FOLDER of modules with an __init__.py that decides what the package hands out. You build both in a fresh project, step04_my_project.
Everything in this step you create yourself in VS Code. None of it ships with the course. By the end the folder looks like this:
step04_my_project/
    .venv/                  # this project's venv
    app.py                  # your application: it uses the package
    import_star_demo.py     # a small file to see what import * brings in
    number_utils/           # your package
        __init__.py         # the front door: what the package hands out
        calculations.py     # your module: the real functions
1. Make a fresh project folder and its venv
Same start as Steps 02 and 03: a new folder next to the last one, with a venv of its own. On macOS and Linux the python command in beat 5 does not even exist outside a venv.
New terminal? Skip deactivate, and cd to the folder that holds your step folders instead of cd ...
2. Make the package folder and its two files
Open step04_my_project in VS Code. Create a folder called number_utils, and inside it two empty files, __init__.py and calculations.py.
The folder is the package, calculations.py will be the module, and __init__.py is the package's front door: Python runs it the moment another file imports number_utils, and whatever it brings in, other files can import straight from number_utils. Leave it empty for now.
3. Write the module
calculations.py is a plain file holding plain functions. Nothing here is new except where it lives.
# A module inside the "number_utils" package. It holds two small functions.

def double(n):
    return n * 2


def percentage(value, percent):
    return value * percent / 100
4. Create app.py and import your own functions
app.py goes directly inside step04_my_project, next to the package folder rather than inside it: number_utils/ is the library, app.py is the application that uses it. Its first line asks the package for both functions.
from number_utils import double, percentage


def main():
    print("Double:", double(25))
    print("Percentage:", percentage(30, 10))


if __name__ == "__main__":
    main()
The last two lines are the guard from Step-03. It is not the lesson here, it is just how a file with a main() gets written from now on.
5. Run it and watch it break
Traceback (most recent call last):
  File "/Users/you/step04_my_project/app.py", line 1, in <module>
    from number_utils import double, percentage
ImportError: cannot import name 'double' from 'number_utils' (/Users/you/step04_my_project/number_utils/__init__.py)
The functions are right there in calculations.py, yet Python says number_utils has no double. Look at the end of the error: it went looking in number_utils/__init__.py, the front door, and found it empty. Asking the PACKAGE for a name means asking its __init__.py.
6. Open the front door in __init__.py
# __init__.py is the package's front door. Python runs it when number_utils is imported.
# It brings the functions out, so other files can do: from number_utils import double, percentage
from number_utils.calculations import double, percentage
calculations.py holds the real functions. This one line brings them out to the front door, so app.py can write from number_utils import double instead of reaching all the way in with from number_utils.calculations import double.
Notice the import is spelled from number_utils.calculations import ..., starting at the package name, not from calculations import .... Python works out imports starting from the folder you RUN in, which is step04_my_project, so the path has to start there too.
7. Run it again
Same app.py, not one character changed. The only difference is the line in the front door. You import your own package exactly the way you imported the standard library in Section 11.
3.0 rather than 3, because / always hands back a float. Same rule Section 04 taught.
A __pycache__/ folder appears the first time something gets imported. That is Python caching compiled bytecode, it is made for you, and a .gitignore like the one in Step-01 keeps it out of Git.
8. Import everything with *
You will also meet a shortcut that grabs everything a package hands out at once. Create import_star_demo.py next to app.py:
from number_utils import *

print("Double:", double(25))
print("Percentage:", percentage(30, 10))
* means "everything", so both functions arrived without being named. Section 07 advised against it in your own code, because a reader cannot see where double came from. You are using it here for one reason: it is the one import that __all__ changes.
9. Limit * with __all__
Add two lines at the bottom of __init__.py, listing ONLY double:
# __init__.py is the package's front door. Python runs it when number_utils is imported.
# It brings the functions out, so other files can do: from number_utils import double, percentage
from number_utils.calculations import double, percentage

# __all__ lists what "from number_utils import *" hands out. Named imports are not affected.
__all__ = ["double"]
Double: 50
Traceback (most recent call last):
  File "/Users/you/step04_my_project/import_star_demo.py", line 4, in <module>
    print("Percentage:", percentage(30, 10))
                         ^^^^^^^^^^
NameError: name 'percentage' is not defined
double still arrives, percentage does not. __all__ is the package's list of names for *: anything left off the list stays behind when someone imports everything.
10. Named imports do not care about __all__
Run app.py, which names both functions itself:
app.py names percentage directly, so it still gets it, even though __all__ leaves it off. That is the whole of __all__: it only decides what * brings in. The front door line from beat 6 is what makes the functions importable at all.
Listing only double was there to see the effect. Both functions are meant to be public, so put percentage back in the list:
# __init__.py is the package's front door. Python runs it when number_utils is imported.
# It brings the functions out, so other files can do: from number_utils import double, percentage
from number_utils.calculations import double, percentage

# __all__ lists what "from number_utils import *" hands out. Named imports are not affected.
__all__ = ["double", "percentage"]
Both names are back, because both are on the list.
11. Module vs package: the mental picture
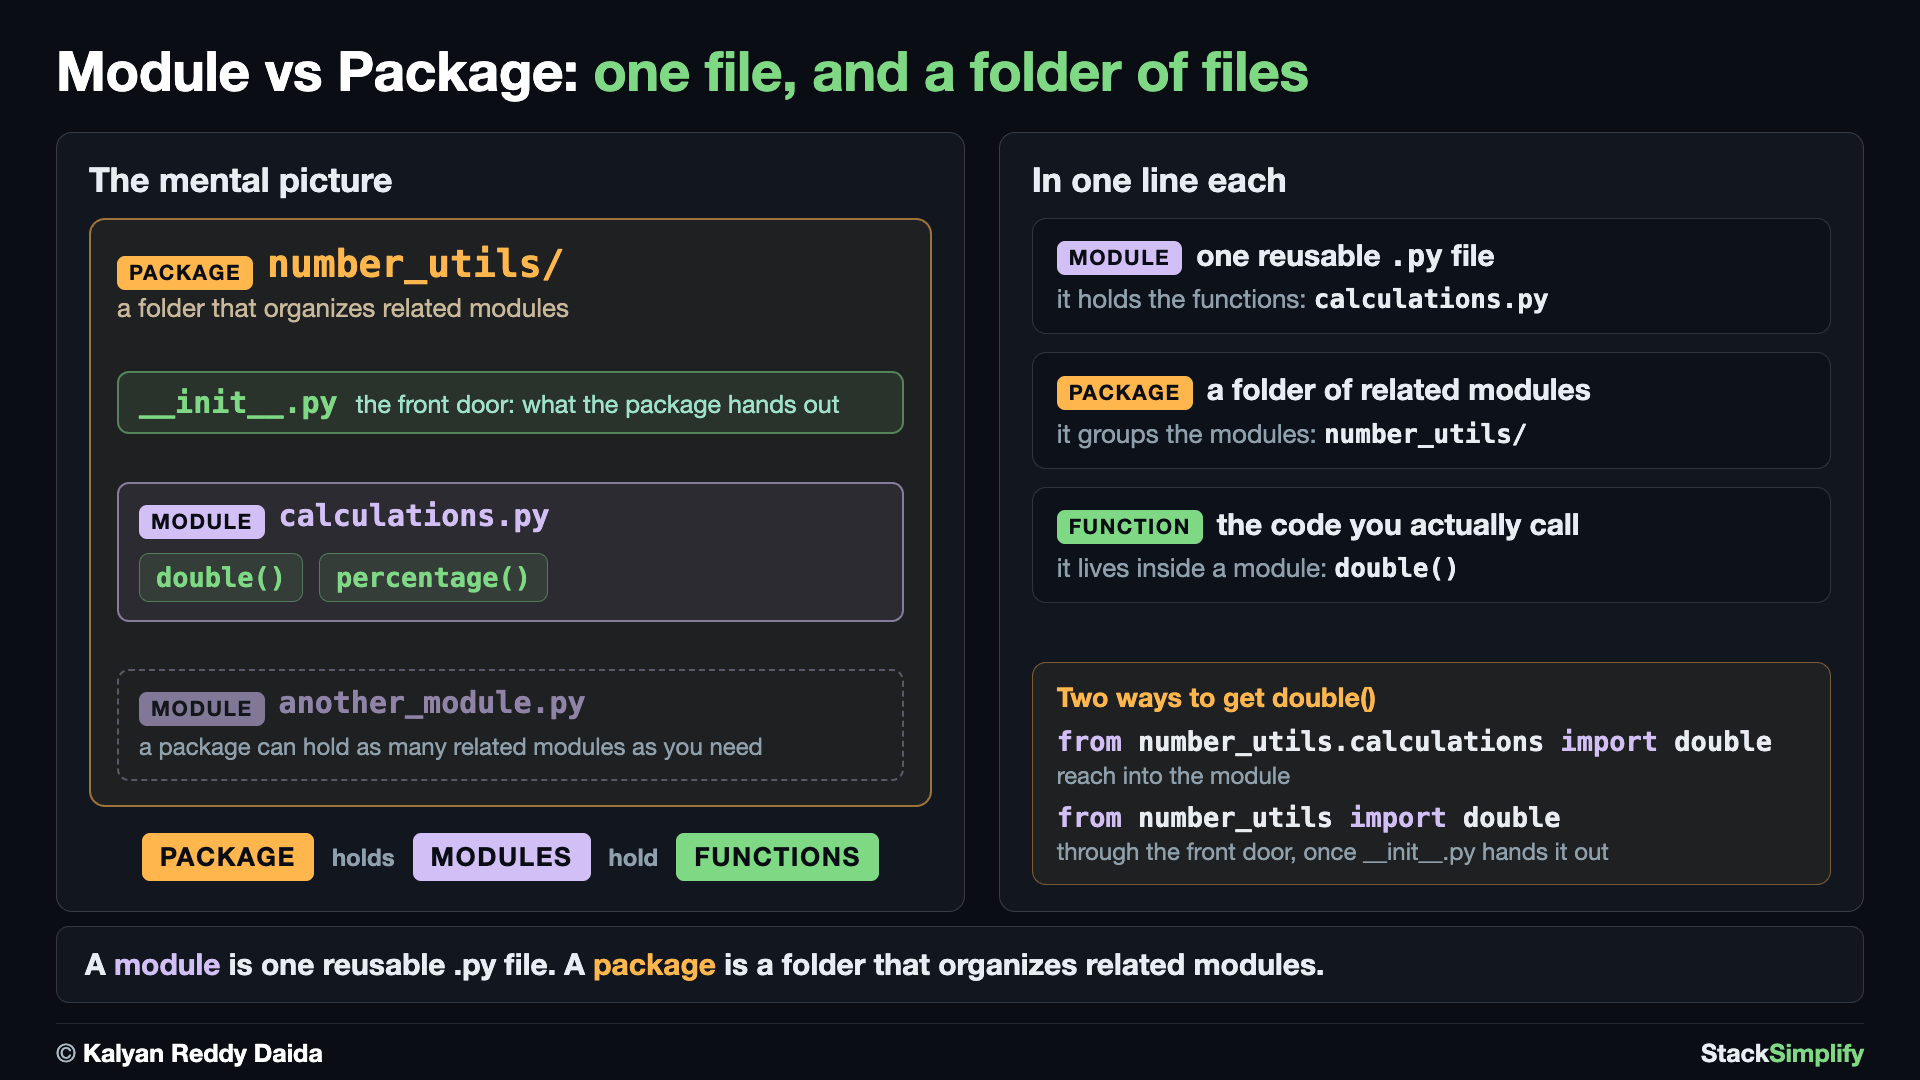
Step back and name what you built. A module is one reusable .py file: calculations.py holds the functions. A package is a folder that organizes related modules: number_utils/ groups them, and its __init__.py is the front door. A package holds modules, and modules hold functions. Today number_utils has one module; a real package can hold as many related modules as it needs.
That is also why there are two ways to get double(): reach into the module with from number_utils.calculations import double, or go through the front door with from number_utils import double.
Compare your work: step04_my_project/ holds this folder exactly as it should look now, so you can check yours against it.
One limit before you move on. Python found number_utils because you ran a file sitting right next to it. Open a terminal anywhere else and ask for it, and it is gone. Step-05 fixes that properly.
Step-05: Package It with pyproject.toml + pip install -e .
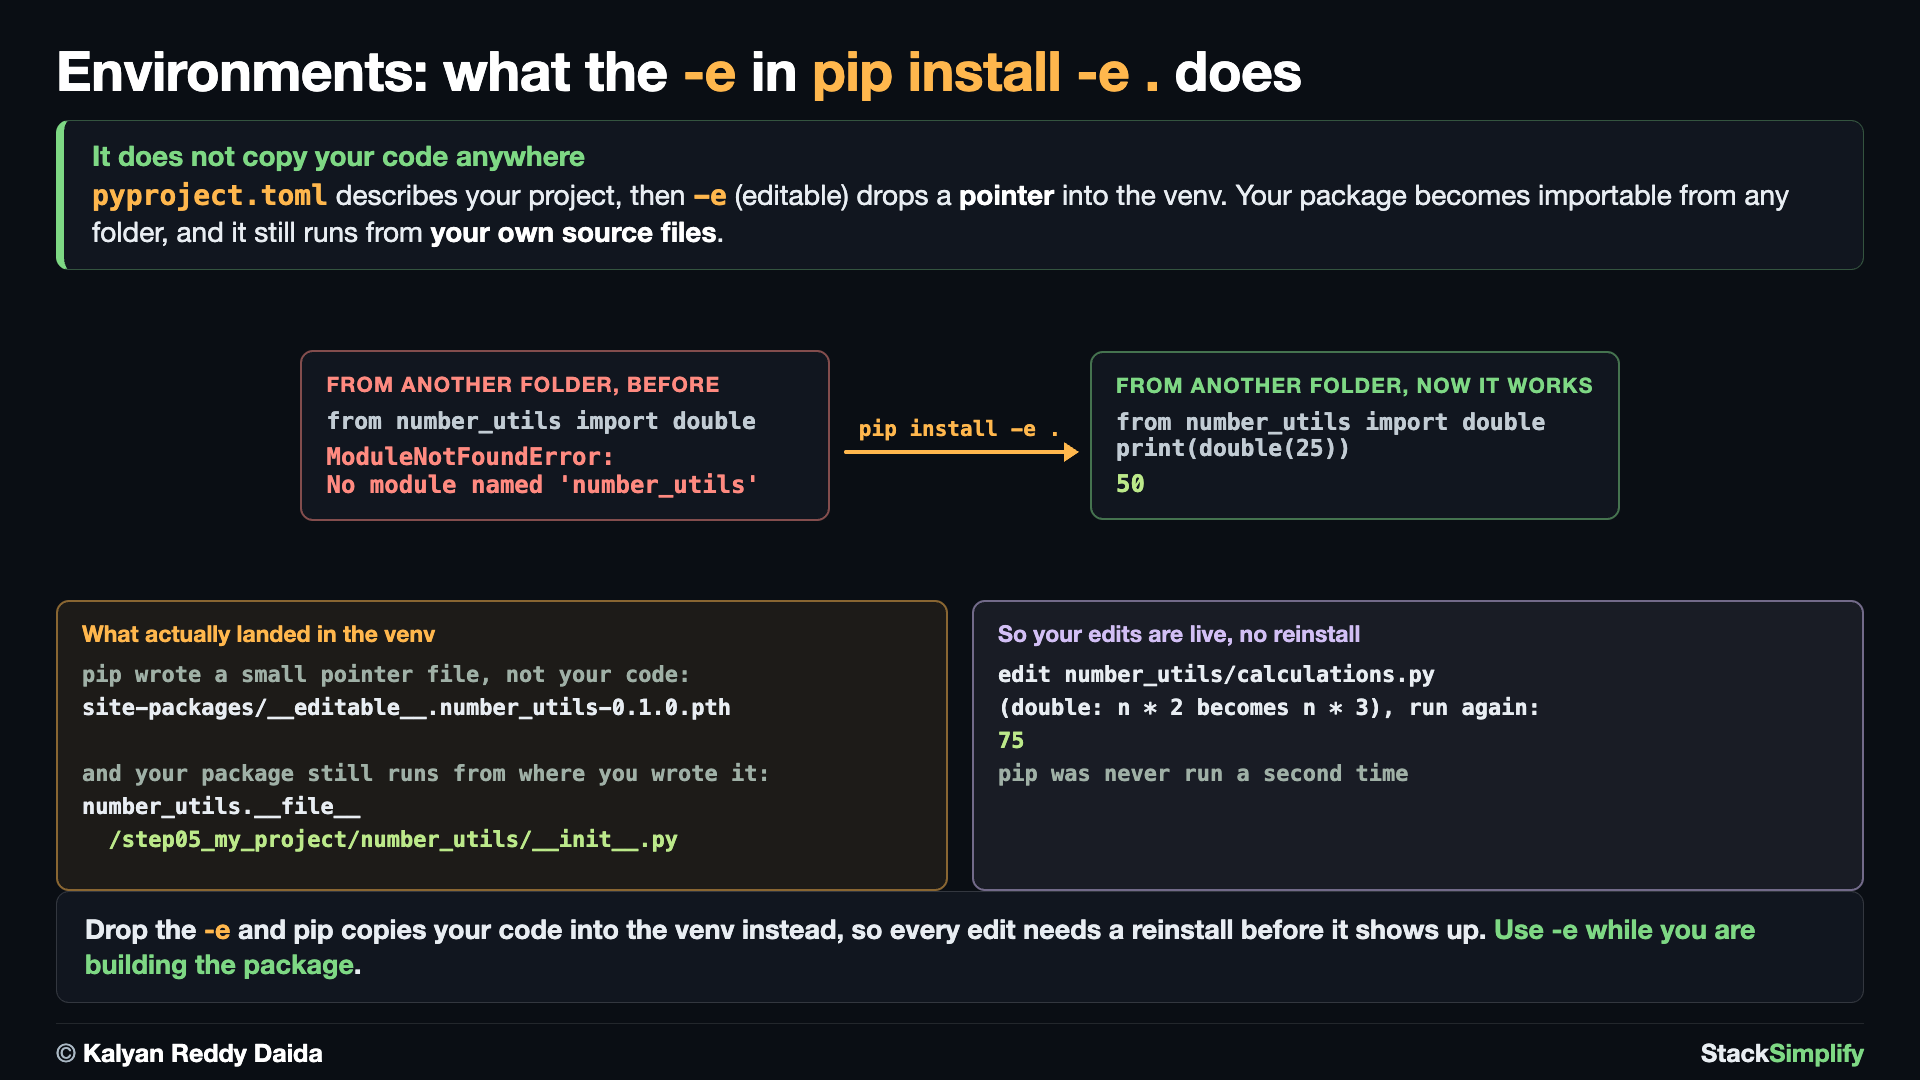
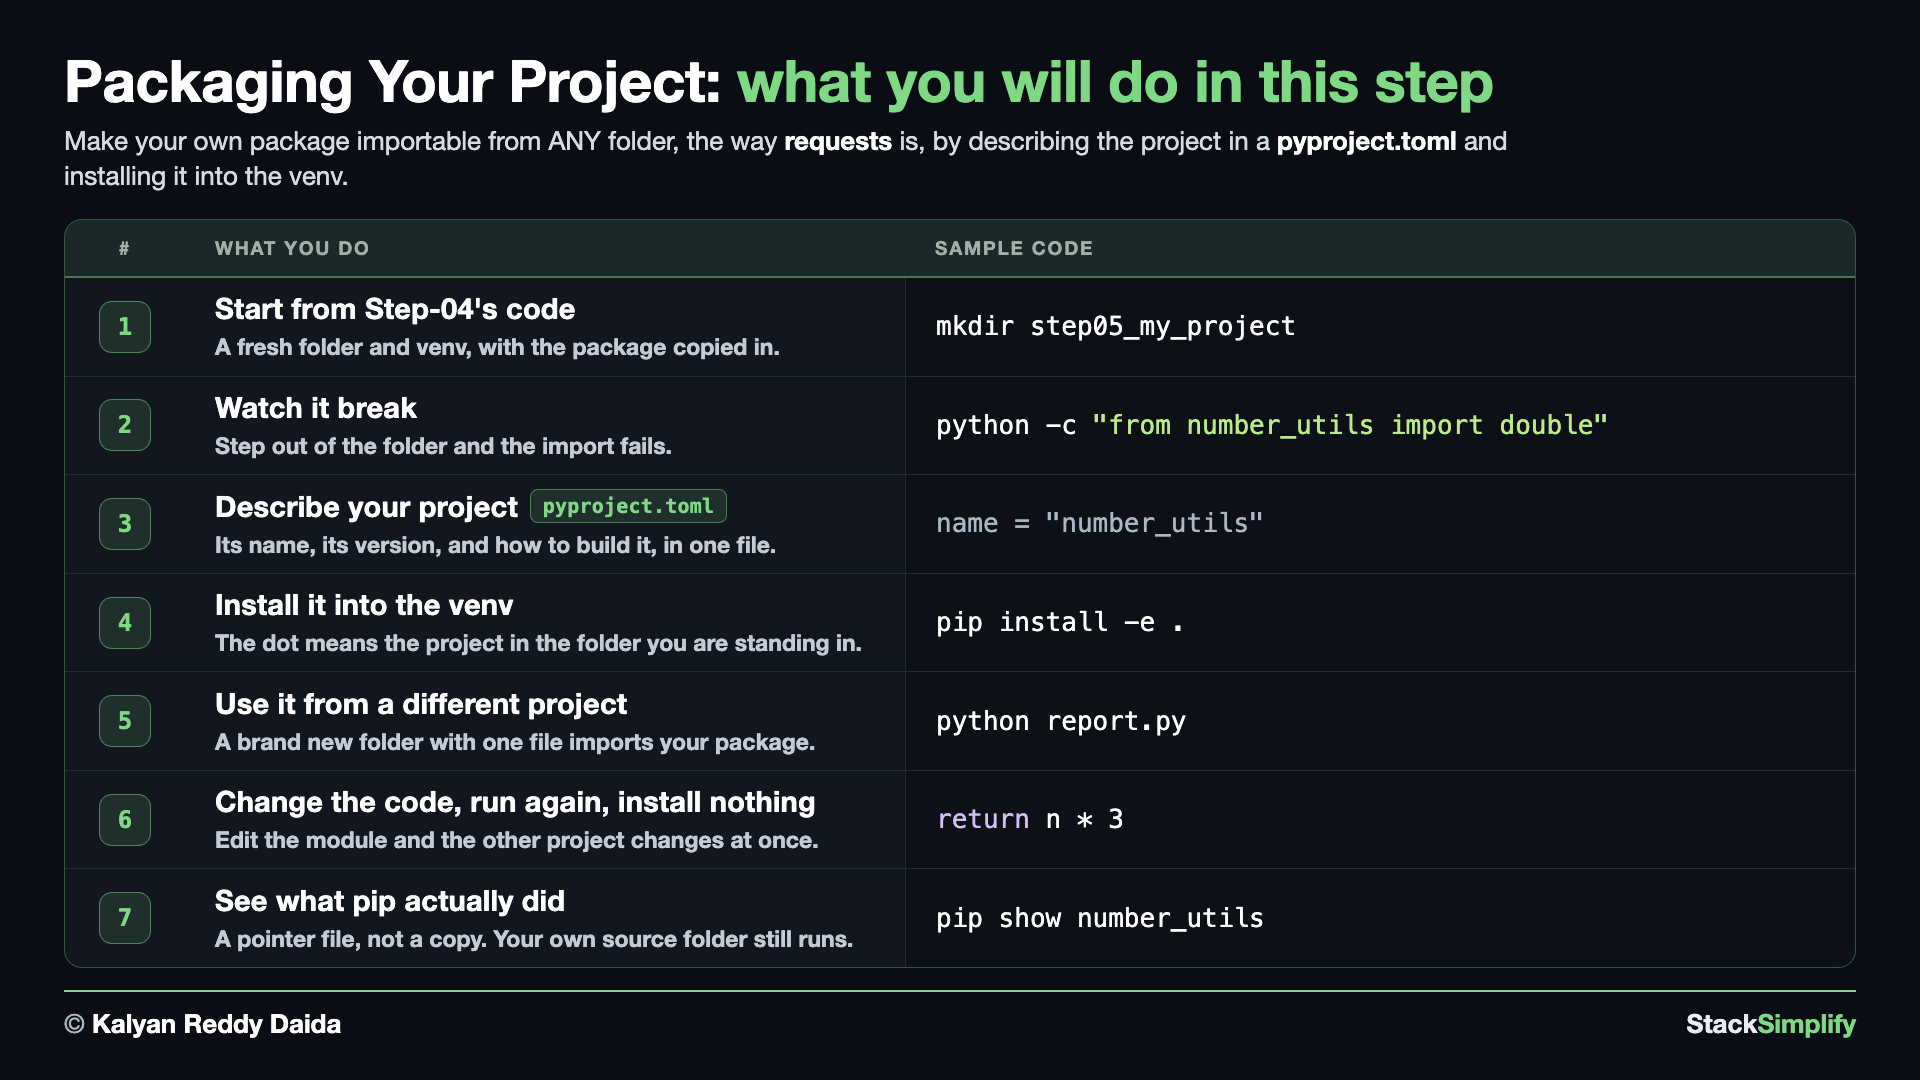
Question: how do we make our OWN number_utils package importable from ANY folder like requests, not just from inside its own project folder? Describe the project in a pyproject.toml, then install it into the venv with pip install -e ..
1. Start a fresh project from Step-04's code
A new folder and a venv of its own, as in every step. This time you do not write the package again: copy number_utils/ and app.py in from step04_my_project, then run app.py to prove the copy works.
The same two lines as Step-04, so the code arrived intact. New terminal? Skip deactivate, and cd to the folder that holds your step folders instead of cd ...
2. Watch it break
python app.py worked because you ran a file sitting next to number_utils/. Step out of that folder and ask for it directly, and Python has no idea what you mean:
cd ..
python -c "from number_utils import double"

cd step05_my_project        # back into the folder that holds number_utils/
Nothing is wrong with your package. Python simply has no record that it exists, because you never installed it. That is what the rest of this step fixes.
3. Describe your project in pyproject.toml
pyproject.toml is the modern, standard file that describes your project in one place: its name, its version, and how to build it. Tools like pip, Ruff, and mypy all read it. Create it in step05_my_project, next to the number_utils/ folder:
[build-system]
requires = ["setuptools>=61.0"]
build-backend = "setuptools.build_meta"

[project]
name = "number_utils"
version = "0.1.0"
description = "A tiny package of number helpers."
requires-python = ">=3.11"

[tool.setuptools]
packages = ["number_utils"]
4. Install it into the venv
The -e flag means editable, and the . means the project in the folder you are standing in right now. So where you run it from is not a detail, it is half the command: you must be inside step05_my_project, the folder that holds pyproject.toml next to number_utils/. Beat 2 put you back there when it finished.
Check (.venv) is in your prompt first
pip installs into whichever Python is active. If you closed your terminal since beat 1, you are no longer in the venv, and this command would install your package into your system Python instead of the project. It will NOT warn you: it prints Successfully installed either way.
No (.venv) in your prompt? Activate it again, from inside step05_my_project:
Now check where you are, install, and check that it worked:
# Verify you are in the step05_my_project folder
pwd

# You should see pyproject.toml and number_utils
ls

# Install number_utils, the package described by pyproject.toml
pip install -e .

# Verify it is installed
pip list
pip install -e . reports what it built and installed:
And pip list now shows your own package in this project's venv:
Package      Version Editable project location
------------ ------- ----------------------------
number_utils 0.1.0   /Users/you/step05_my_project
pip          26.1.2
Only two rows, because this venv is brand new: requests from Step-02 lives in Step-02's venv, not this one. Each project really does keep its own toolbox.
Look at the third column, which was not there in Step-02. pip list only grows an Editable project location when something is installed with -e, and number_utils is the only row that has one. It points straight back at your own folder. That column IS the proof: pip did not take a copy of your code, it wrote down where your code lives.
Run it from the wrong folder and pip tells you so plainly, which is the one error in this step you are most likely to meet:
ERROR: ... does not appear to be a Python project: neither 'setup.py' nor 'pyproject.toml' found.
That is pip looking for a project where you are standing and finding none. cd into step05_my_project and run it again.
Like pip install requests in Step-02, this one reaches out to the internet the first time, because building your project downloads the build tool it needs.
5. Prove it: use it from a different project
Beat 2 failed from one folder up. Now do the real test: build a second project that has nothing to do with the first one, and use your package there.
Keep step05_my_project's venv active: this second project has no venv of its own, and borrowing that one is the point of the test.
Create one file in it. In VS Code, open this new step05_my_project2 folder and make report.py:
# This file lives OUTSIDE step05_my_project. There is no number_utils folder next to it.
from number_utils import double, percentage

price = 25
print("Double the price:", double(price))
print("10 percent of 30:", percentage(30, 10))
Look at the folder before you run it. report.py is the only thing in there:
That is the whole step in one result. A brand new project, with no number_utils/ folder anywhere near it, imported your package and used it. That is exactly how requests behaves: you do not keep a copy of requests next to every file that imports it, you install it once into the venv and it is simply there. Your own code now works the same way.
A quicker way to check an import
When you just want to know whether something imports, you do not need a file at all. python -c runs a line of Python straight from the terminal:
Handy for a one-second check. Real work goes in a .py file, which is why report.py is the version that matters here.
6. Prove the -e: change the code, run it again, install nothing
This is what "editable" buys you, and it is worth seeing rather than being told.
Leave report.py exactly as it is. Go back to VS Code and edit the OTHER project: open step05_my_project/number_utils/calculations.py and make double triple instead:
Save it. Now, still sitting in step05_my_project2, run the same unchanged file as beat 5. Do not reinstall, do not touch pip:
You edited one project and a different project's program changed, with no reinstall, because pip install -e . never copied your code. It wrote down where your code lives. Every edit is live from the next import onward, which is exactly what you want while you are still building something.
Change calculations.py back to n * 2 before moving on.
7. What pip actually did
Ask Python where the package lives, and ask pip what it installed. These work from anywhere, so stay where you are:
python -c "import number_utils; print(number_utils.__file__)"
pip show number_utils

cd ../step05_my_project        # head home: the checkpoint below runs from inside the project
/Users/you/step05_my_project/number_utils/__init__.py
Name: number_utils
Version: 0.1.0
Python is reading your own source folder in step05_my_project, not a copy hidden inside the venv. What pip put in the venv is a small pointer file:
That one file is the whole trick, and it is why beat 6 worked.
An number_utils.egg-info/ folder also appears next to your code. It is bookkeeping from the install, and the .gitignore from Step-01 lists *.egg-info/ for exactly this reason.
What you just achieved: you turned your own folder into an installed library. In Step-04, import number_utils only worked from inside the project folder. Now it works from ANY folder in the venv, exactly like requests. This is the entry point to real packaging, and the base every later course builds on.
requirements.txt vs pyproject.toml
requirements.txt is a flat, pinned snapshot for reproducing an environment. pyproject.toml is the project's identity + how to build and install it. Beginners meet both; modern projects lean on pyproject.toml.
Compare your work: step05_my_project/ holds this finished project, and step05_my_project2/ holds the one-file second project from beats 5 and 6.
Step-FINAL: Run It Checkpoint
Prove the whole section in one go, on the project you finished in Step-05. This throws your environment away and rebuilds it from the file that describes your project, which is the strongest test there is. Run it from inside step05_my_project, with .venv active, since step 1 starts by leaving it:
deactivate                     # 1. leave the environment
rm -rf .venv                   # 2. throw the whole toolbox away
python3 -m venv .venv          # 3. build a new empty one
source .venv/bin/activate      # 4. activate: your prompt shows (.venv)
pip install -e .               # 5. install your OWN package (editable)
cd /tmp                        # 6. leave the project folder...
python -c "from number_utils import double; print(double(25))"   # ...it still imports
deactivate                     # 7. done for the day
deactivate                     # 1. leave the environment
Remove-Item -Recurse -Force .venv   # 2. throw the whole toolbox away
python -m venv .venv           # 3. build a new empty one
.venv\Scripts\Activate.ps1     # 4. activate: your prompt shows (.venv)
pip install -e .               # 5. install your OWN package (editable)
cd $env:TEMP                   # 6. leave the project folder...
python -c "from number_utils import double; print(double(25))"   # ...it still imports
deactivate                     # 7. done for the day
(.venv) appears in your prompt after step 4
Successfully installed number_utils-0.1.0
50
If those lines appear, you deleted your environment and got your package back from one text file, and it imports from a folder that has nothing to do with your project. That is the whole point of this section.
What You Learned
- A virtual environment (
python3 -m venv .venvon macOS and Linux,pythonon Windows, then activate) gives each project its own isolated packages; verify withpython -c "import sys; print(sys.prefix)", and add.venv/to.gitignore. pip installadds a package (and its dependencies) to the active venv;pip freeze > requirements.txtrecords them andpip install -r requirements.txtrestores them.- A module is a
.pyfile; a package is a folder of modules whose__init__.pyis the front door that decides what the package hands out, and__all__only decides whatfrom package import *brings in. - Python gives every file special names such as
__name__,__file__and__doc__;__name__is"__main__"when you run the file and the file's own name when it is imported, which is whyif __name__ == "__main__"stops run-it-directly code from firing on import. pyproject.toml+pip install -e .turn your package into an installable project that imports from anywhere: the base for real packaging.
How This Connects to the Next Courses
- Python for Machine Learning / CCFD: every project runs in its own venv with a pinned
requirements.txt, and shared code lives in installable packages (autils/package youimport), exactly the workflow you built here. - MLOps on AWS:
pyproject.tomlis where real projects declare their identity and dependencies; the packaging you just met is the base each later course builds on.
Next
Section 13: Classes and OOP Basics. Model real things as objects with their own data and behavior: the last foundation before the Complete Python Bootcamp (C2).
Prefer to learn by watching?
The full video course teaches every concept on screen and builds the projects with you, step by step.
Section 11: Standard Library Essentials Next: Section 13: Classes and OOP Basics